Monday, July 23, 2012

DIY Plush Alphabet

My best friend's baby just turned one this week. I am still in shock that Katie has a baby, let alone a one year old! Austin is like a real person now. Last I saw her, she looked like this:

Austin: 3 weeks old


I moved to England just a few weeks after Austin was born, but I've been able to watch her grow up through Skype and Facebook. Isn't technology amazing?

I wanted to make something special to celebrate this huge milestone. When I saw a tutorial for plush alphabet letters I thought it fit the bill nicely.

Plush Alphabet Tutorial

I knew this would be a challenge, especially since I am just learning how to sew, but I was encouraged by this statement in the tutorial:
Who's going to care if you the hole you cut out on the letter "O" is a little wonky? I won't--I mean, look at that hole on my own letter "O" above. This pot will not be calling any kettles black.
Free license to make my letters wonky? I'll take it!

My first step in making these letters was to get the fabric. I went to my local fabric store, but they didn't have what I was looking for. After doing some research online, I discovered that I needed a "layer cake" which is 20-40 10" inch squares of coordinating fabric. I fell in love with this fabric from the Missouri Star Quilting Company:
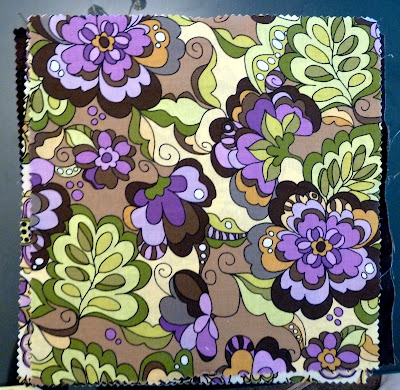
Fiona's Fancy 10" Squares by Lila Tueller for Riley Blake Designs 


I also bought batting and magnets online.  Initially I intended to make the letters magnetic; however, magnets are very toxic if swallowed. I didn't trust my sewing enough to guarantee that the seams wouldn't rip and the magnet wouldn't come out. I made the first several letters into magnets, but decided halfway through to abandon that. Luckily it was easy to take the magnets out and make them plush toys instead.

I cut fifty-two 4 inch squares of batting--I used two squares for each letter. You really don't need to cut exact squares though. Each letter is pretty small (only around an inch), so it might be better to cut as you go rather than doing them all the same size in advance.


Batting

They really are super strong!

The tutorial from Chez Beeper Bebe included printouts for the letters. You can use any font you like though. I appreciated that these had as few curves as possible :)


Now that I had my fabric, batting and letters, it was time to get started. I arranged the fabrics in a way that was pleasing to my eye and grabbed my "z" fabric.

Following the tutorial, I traced my letter in reverse onto small pieces of folded fabric and then placed the batting in between the layers.


Since I initially planned to make these into magnets, I put the magnet in between the fabric and first layer of batting. This put the magnet at the back of the finished letter (because I traced the letter in reverse).


Then I sewed the letter, following the lines I traced. At this point I realized I like some letters way more than other letters. Z is always welcome in my home--S, not so much.

Nice straight lines

Lots of mean curves

This project took me a while, mostly because I'm such a novice sewer. For someone who actually knows how to sew, it is a relatively easy project. I think they turned out great though. Definitely wonky and homemade, but pretty cute.


I used some leftover fabric to made a quick draw-string bag for the letters.


I am so thrilled by the way these turned out. I'm even happier to hear that Austin is enjoying them!


Happy birthday Austin!! Aunt Calli loves you :)

Friday, July 20, 2012

Taking in Amsterdam's Culture

Of course we did more than just eat and sit on a boat in Amsterdam. We saw a ton of great museums, including the Anne Frank House, the Van Gogh Museum, the Hermitage, the Jewish Heritage Museum and the Portuguese Synagogue.

The Anne Frank House was very moving. I'm sure everyone knows the story of the family that was forced into hiding for two years by the Nazis--if not, click here. The museum brings the tragedy to life. I highly recommend a stop here if you're in Amsterdam.


The Van Gogh museum, on the other hand, was just OK. I love Van Gogh, but the museum layout was confusing and there wasn't a lot of information. I paid the €5 for the audio tour, but it wasn't very informative. I'd say that you still have to see it if you're in town, but just know what to expect going in.

We did a quick stop at the Hermitage, which was fine because there isn't much to see. This impressionist museum is well done, with a nice, airy layout, but there aren't that many rooms. It suited me fine though; sometimes just a quick hit of culture is what you need :)


The Jewish Heritage Museum and Portuguese Synagogue were really interesting. It was almost surreal though. My experience in most museums is learning about something new--something foreign. This is the first time I've been to a museum that has an audio tour explaining my culture and daily practices (e.g. prayers, traditions, foods). It would be like going to a modern American exhibit and having the audio guide explain that many American families eat dinner in front of the TV. Do you know what I mean? It was both cool and weird.

Portuguese Synagogue

We were too late for tulips this year, but we did see the flower market that had hundreds of bulb varieties for sale!


We only had a few brief moments of sunshine, but we took full advantage of them by laying out in Vondelpark. 


While it was pouring buckets, we ran into the NEMO science museum. We encountered something that neither of us were expecting: a sex exhibit--for children.

I know Amsterdam is known for their open sexuality (see Red Light District), but I was really shocked to see this exhibit. It was called "Let's Talk About Sex" and was designed for teenagers. I'm all for teaching teenagers about sex so that they can make informed and responsible choices, but this was a bit much for me. Is it really necessary to have an entire display on sexual positions and novelty condoms?

Display in NEMO Science Center

"Mounting of an Ass"


There were also peep-show booths explaining orgasms and showing both male and female erogenous zones. And, since it's a hands-on museum, there was a display where kids could use their arms to practice french kissing.

Children practicing french kissing at NEMO
source
I know it's my puritanical American sensibilities, but I was really shocked by this. What do you think? Is this a healthy attitude to have? Should we have more of this in America? This blogger made some good points about how low teen birth rates and abortions are in the Netherlands compared to the U.S. It's definitely something to think about.

Speaking of the Red Light District, no trip to Amsterdam is complete without a visit to the seedy underside of the city. We didn't spend too much time there--it's just not our scene. 


Magic mushrooms for sale

What I love most about Amsterdam is that it has so many faces. I can sit in a beautiful park on minute, float down the canals another, and watch men buy hookers the next. There's really something for everyone :)


Thursday, July 19, 2012

Views from the Canal

As I mentioned earlier, Dan and I went to Amsterdam for a long weekend. We ate our way through the city, but also managed to see some sights :)

One of the best things we did was the hop-on, hop-off canal tour. I highly recommend it. It's a great way to see the city at your own pace. We bought our tickets around 5pm on Friday and then had the rest of the evening and all the next day to use them. We definitely got our money's worth.  

I was really impressed with some of the houseboats we saw. They were much more modern than I was expecting. As Dan said, a lot of them looked like they were straight out of an IKEA catalogue. 

Chic houseboat


Not so chic houseboat

I was also impressed by the floating islands. There are several of them throughout the city, but this one was one of the largest. It has so many plants and trees growing on it that it's hard to believe it's not on solid land!

Floating island

Amsterdam has some beautiful architecture. I love the gables on the canal row-houses. I learned a fun fact dating back to the 1600s: the houses almost all have a hook and pulley system at the top to help move furniture in. The spaces are too narrow to get furniture to the top floors otherwise. The houses are also built with a slight lean forward so that furniture wouldn't damage the façade.

Canal house with hook and pulley

The NEMO


This was a parking lot just for bikes! It has thousands of spaces, but it is not enough. The city is planning to build more lots with around 10,000 more spaces.

Bike parking lot!


Tuesday, July 17, 2012

Welkom in Amsterdam!

This past weekend Dan and I slipped away to Amsterdam. I am still not used to the fact that I can hop on a plane and be in Amsterdam in less than an hour. I am so lucky to be living in Europe and to have opportunities like this one!


Up until this trip, we've been flying out of Manchester airport which is around 1.5 hours away. This is the first time we flew out of Leeds-Bradford and my life will never be the same. It is SO convenient! The airport is only 30 minutes away by bus, and the bus stop is literally across the street from my house. Amazing!

Amsterdam is such a great city. The public transportation is fantastic, but the city is very walkable too. Though the weather didn't cooperate at all, we still made the most of our trip. Coming as a surprise to no one, we ate our way through the city.

We had many of the traditional Dutch dishes including pancakes, herring sandwiches, french fries with mayonnaise, and waffles. The pancakes were like unfolded crepes--delicious!

Savory Dutch pancake

The herring was good, but I only wanted a bite or two. I loved the pickles and onions that are traditionally served with it, but the fish itself was a bit too slimy for me.

Traditional herring sandwich

More herring

We searched for a while to find both the fries and the waffles, but they were worth the wait. The fries were the best I've ever had. They were so crispy and salty and the mayo was tangy and creamy. It was heavenly. I could have eaten my own weight in this stuff.


The waffles were much better in Belgium though. I think we'll have to plan another trip there soon :)


Our first night we stumbled upon a great little Dutch restaurant in the Leidseplien neighborhood where we were staying. I had a Heineken just to say I had one in Amsterdam.

Cute Dutch restaurant in Leidseplein

Having a Heineken in Amsterdam

Dinner the next night was in an upscale vegetarian restaurant called Betty's. The menu changes weekly based on what's in season, and there's only one option. The owner, a vegetarian himself, has been in the business for 25 years. Eight years after buying this restaurant, he decided to turn it into an all vegetarian place. Apparently he's doing pretty well because the restaurant was full and he was turning people away.


This week's menu was a crispy polenta cake with ratatouille and marscapone. Side dishes included minted potatoes and peas; eggplant dip; "street salad" (chickpeas and couscous wrapped in lettuce); fresh watermelon; dried cherries and pomegranate seeds. YUM!

One of our lunches was an all-you-can-eat sushi place. It was so amazing! I miss sushi so much. I totally gorged myself on salmon. Ha!


We even found a Kosher restaurant in Amsterdam! It wasn't anything to write home blog about, but I was really happy to have a steak.

Probably the best meal we had was at Restaurant Greetje. I booked it based on tripadvisor reviews, and I'm happy I did. It was delicious! I had the fillet of weever--a first for me. The skin was really crispy and the mashed potatoes were fantastic. We also split the homemade croquettes which were out of this world! I didn't know what to expect, but they were just amazing. Seriously check this place out if you're in Amsterdam.

And that was basically our trip to Amsterdam...just kidding. We stopped stuffing our faces for long enough to actually see some sights. Stay tuned for Part 2 of our long weekend in Amsterdam!

Tuesday, July 10, 2012

Strawberry Rhubarb Jam

As promised, I got back in the kitchen and made more jam. I can't help myself. It's addictive. This time I decided to make a strawberry rhubarb jam. I had some leftover strawberries that may not have made it the rest of the week, and I have rhubarb growing in the back garden. Seemed like destiny to me.

Rhubarb

Fresh rhubarb

Strawberries and rhubarb

I'm learning a lot as I go. For instance, did you know that pectin is the chemical that makes jam gel? Without it--or without enough of it--jam is really runny. Pectin is a natural ingredient found in fruit. Apples, plums, berries and citrus peels are very high in pectin. When I made my last jam I didn't need to add any additional pectin because I added orange peel. This strawberry rhubarb jam wouldn't have enough natural pectin to gel, so I added some. You can usually find pectin in the baking aisle of the grocery store.

Powdered pectin

I used David Leibovitz's recipe as a base, but changed it slightly to better meet my needs. I used strawberries instead of mixed berries; gave equal weight to both the rhubarb and strawberries; and added pectin. I weighed my strawberries and then just picked that amount of rhubarb. It made slightly more than one jar.

Strawberry rhubarb jam

Stirring the jam

Recipe adapted from here
  • 7 ounces rhubarb, trimmed and sliced into 1/2 pieces
  • 7 ounces strawberries, slightly mashed
  • 2 ounces water
  • 1 cup sugar
  • a squeeze of lemon juice
  • a tiny pinch of salt
  • a teaspoon of pectin*
Put rhubarb, berries and water in a pot. Cook covered, stirring frequently over moderate heat, until the rhubarb is cooked through and thoroughly tender. It should take about 15 minutes.

Add the sugar, lemon juice and salt. Bring to roiling boil (where the boil doesn't break even when you stir) and add pectin. Cook for at least one minute longer. Jam should be around 220F or should pass the wrinkle test.**

Ladle into sterilized jars (see how here) and keep in fridge.

Homemade jam


I am completely obsessed with this jam. It's SO GOOD!! It's sweet, but perfect. And trust me, it makes the BEST peanut butter and jelly sandwich.

Now that I'm on a roll, I don't think I can stop. It's a sickness. I might even be back later this week with more jam. I wish I were kidding.

*I am new at using pectin so I started with a teaspoon and waited to see what happened. It seemed to be the right amount, but it will depend on the fruit you're using. Don't be afraid to experiment a bit to get the texture you want.

**The freezer test: put a plate in the freezer. When jam is close to done, put a small amount on the cold plate and return it to the freezer for a few minutes. If the jam wrinkles when moved, it's done.

See my other jam-making exploits here: